
This is higgins. It is a simple slide viewer.
Press space to go to the next slide.
(And hit F11 to go full screen)
Write your slides in plain Html (or markdown).
You can also use the arrow keys to move forward or backward.
Move forward now. »
Each slide is a div with a class of slide.
They look like this:
<div class='slide'>
<p>This is a simple slide viewer.</p>
<p>Press space to go to the next slide.</p>
</div>
# Or use Markdown
You can also write your slides in markdown.
Just include an "`md`" class on any slide, and it will convert the slide's content from Markdown to HTML on the fly.
Add css classes to your slides
to change their colors.
You can include notes with any slide.
See that little 'n' in the top right?
click that to show the notes for a slide.
Notes are shown in a smaller font as they are really for the benefit of the presenter not the audience.
They can be a helpful cue for what to say on each slide.
To include notes for a slide, just include an element (such as a span) with a class of notes. Notes are hidden by default.
Click the 'n' again to hide the notes. (Or just move to the next slide.)
* Notes can also be written in markdown.
* Include an "`md`" class on the .notes span.
* this note is written in *markdown*
* higgins uses 'commonMark'
You can include **images** if you like that sort of thing
I tend to put the images in the `image` subfolder. But it's up to you.
I built this tool for a talk at 'Brisbane Alt.net'.
I didn't have powerpoint on my netbook, and wanted to be able to write the slides while on the bus.
I've subsequently used it for talks at the Brisbane .net user group, WDCNZ (Web Developer Conf New Zealand) and DDD Brisbane.
I like using it. I make little improvements each time.
To use higgins in your own talk, just fork this repository, and edit the file 'index.html'
That's all there is to it.
When you're finished:
You can make the slides available on line through the magic of 'github pages'
To do this, go into the settings of your repository...

Yes that one!
Scroll down to the section headed **GitHub Pages**
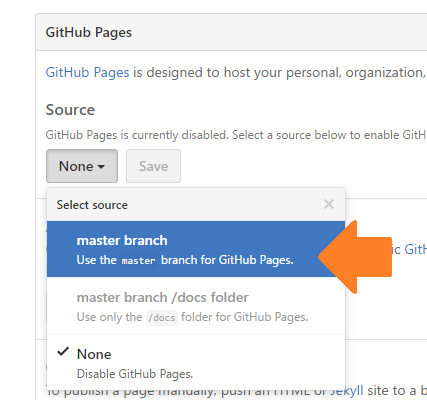
Check the "master branch" and click "Save"
Then github will tell you the url at which you can browse your slides...
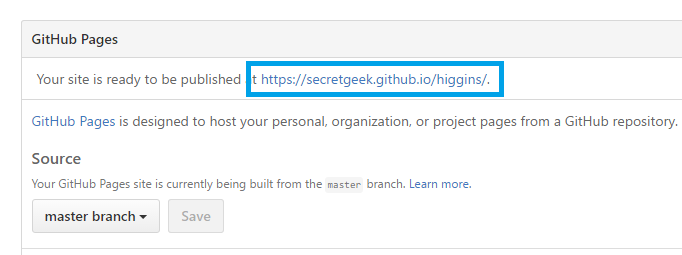
It will be:
`https://{YourUserName}.github.io/{YourProject}/`
Other Tools I recommend:
* [ZoomIt](https://technet.microsoft.com/en-us/sysinternals/zoomit.aspx) from sysinternals
* For Zooming in and for drawing on screen.
* [BigNote](https://github.com/secretGeek/BigNote) from [Joseph Cooney](http://jcooney.net/)
* BigNote lets you write gigantic text on the screen.
(And one of those laser pointers would be a good thing to have also.
Unless giving a talk in front of cats)


One more thing...
The slide number, at the top left, is a hyperlink.
It lets you deep-link into any slide.